Royal Military College of Canada
Department of Electrical and Computer
Engineering
EEE473 Computer Network Design
Dr G.S. Knight
Dr S. Leblanc
Lab 2 -
Introduction to Network Configuration and Packet Capture
References
-
Objectives
This lab aims to:
- Walk you through the basics of network configuration on a host
- Introduce to packet capture
- Walk through rudimentary packet analysis
Introduction
This lab is a further introduction to the laboratory environment in Lab
4112. You will configure a small network consisting of some laboratory
computers, a central computer hosting a telnet server, an
ftp server and a web server, an Ethernet hub and patch panel. You
will also use a packet capture tool to provide data dumps of the traffic
being carried on the network. Analysis of these dump files will help you
understand the nature of datagram based network communication and the
layering of network protocols.
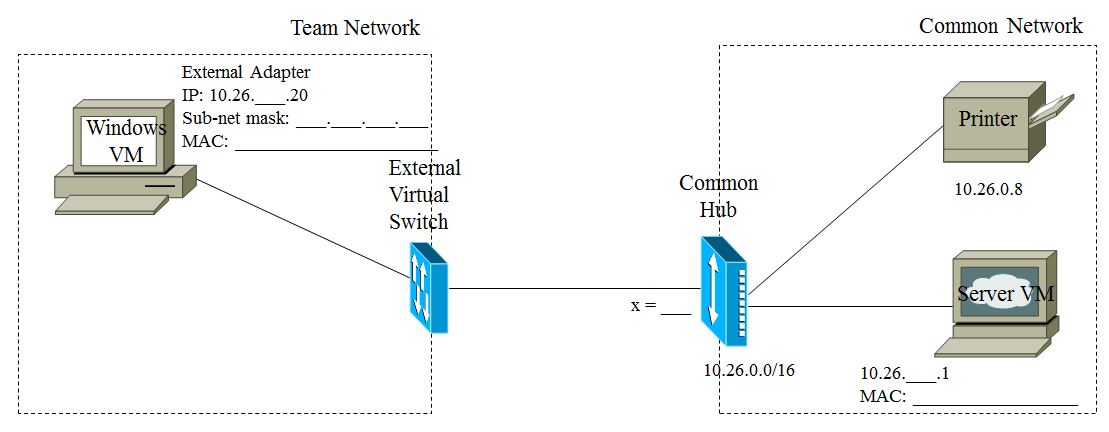
Part 1 - Building a small network

Figure 1 - Network Configuration
- Log on to the host machine.
- For this lab you require a connection between your Team Network and
the Common Network as shown in Figure 1. In order to connect your
External Virtual Switch to the Common Hub, you will use the Patch Panel
in the cage.
- Recall from the Preamble that your host has a unique number x.
- Record x in the space
provided in Figure 1.
- At the Patch Panel use a green cable to connect the green port of "Workstation x" to the corresponding numbered
port on the "Undergrad Hub".
- Make sure you have green link-lights on the hub indicating that your
machine is up on the network.
- Start the Windows VM
- The Common Network is a sub-network described by the IP address
10.27.0.0/16. That is, the first 16-bits of the IP addresses on this
network describe the network address, the last 16-bits describe the
host address. The address of the Server VM
is 10.27.x.1.
- You must now configure the Windows VM to work on this subnet by
appropriately setting its IP address and network mask . (See
instructions below).
- It is important to ensure that you do not use the same IP address
as another student, as you are not interacting with other students'
machines during this lab.
- To that end, you will use 10.27.x.20 as the unique IP address for
your Windows VM.
- What do you think your sub-net mask should be? Record it here:
____________________________
- Configure the Network Adapters
- In each lab, if you forget how to access commonly used applications,
refer to the preamble. For example, recall that to configure an
adapter:
 ->
Control Panel -> Network and Internal Connections ->
Network Connections
->
Control Panel -> Network and Internal Connections ->
Network Connections
- Ensure that the Internal adapter is disabled.
- If not disable the Internal adapter
- Enable and configure the External
(it may be called Local Area Connection) adapter
- Right-click ->
Enable (if need be)
- Right-click -> Status
- Then in the General tab,
select
Properties
-> Internet
Protocol (TCP/IP) -> Properties
and select "Use the
following IP address:"
- Set your IP address and sub-net mask.
- You do not have to worry about the Gateway or DNS settings for
this lab.
- Test your network connection.
- Open a Command Prompt and check to make sure your network
configuration settings are correct by running:
- Confirm your connection to the network by pinging
yourself, the Server VM and the Printer.
ping 10.27.x.20
- to make sure you can communicate with yourself
ping 10.27.x.1
ping 10.27.0.8 - to make sure you can
communicate with the printer
- The Server VM is running a
telnet daemon. Use telnet to log in to
alice's account on the Server VM.
- Log into the account:
alice
, with the password: secret
- Log out of the account:
logout
- You should now have your small network up and running.
Part 2 - Setting up printing using a local
"Standard TCP/IP port"
To print you will need to add a new printer to the Windows environment. Do
this by going to the Printers and Faxes tool in the Windows control panel.
Only do this once your network is set up and you were successful in pinging
the printer.
-
-> Printers and Faxes ->Add a printer to start the
Add Printer Wizard. You want to add a network printer.
- Select Connect to a printer on the Internet. Enter:
URL:
            http://10.27.0.8
- Select
Have Disk. Enter: C:\Lexmark .
Select Lexmark E360dn PS3
- Finish creating the printer using the wizard.
You should now be able to print using the Lexmark printer.
Part 3 - Analysis of network packet capture data
The tool windump is a port of the popular tcpdump.
You will use windump to capture and analyze network
traffic. Run the windump program in a Command Prompt
shell. First run windump with the -D switch to
discover the names and numbers of the network interfaces on your computer
(eg. windump -D); note that case matters. You will also notice
that the adapters listed by Windows are "cryptic", however only the External
adapter should be enabled at this stage.
- Run
windump
            -D
- Confirm
that there is only one adapter listed. If the steps above were
followed correctly, this is the External adapter.
Record the first four bytes of the device name here: ______________
- Enable the Internal adapter and run
windump
-D again; you should now be able record the first four bytes
of the Internal adapter: ______________________
- Follow the procedure above whenever you want to be able identify the
adapters as they are listed by Windows under
windump.
The good news is that the unix/linux equivalent to windump,
called tcpdump, is much clearer in how it identifies
interfaces.
- We use the the
-i switch to specify the adapter to use
as follows: windump -i 2
- We only need use the External adapter
today, so disable the
Internal adapter. Since there is
only one adapter we can use windump without specifying
the adapter with the -i switch; it will default to the
single (External) adapter.
Now invoke windump and suppress host and port number lookup
using the -n switch
(#1) Ensure that you understand why this usage is so important. As each
packet is read by windump, what happens if the -n
switch is omitted?
- Note: Whenever we ask you a
question in the lab instruction, you must provide a suitable answer in
your lab report and label your answer with the number in brackets so
that I can find it easily (remember how the discussion is the most
important aspect of the report).
In another Command Prompt, use a telnet session to
communicate over the network with the Server VM
using user alice as before.
Observe the packet-by-packet network activity reported by windump.
Intermingled with the telnet packets you might also notice a
good deal of other network traffic. This traffic is likely associated
with some of the built-in services of the Windows operating system.
There may also be packets associated with the other student's computers on
the network.
- Record some of the other student computer's IPs seen in your traffic
trace, and explain who they were communicating with: #2
-
___________________________________________________________________________________
Without any filtering applied, all the traffic being presented can lead to a
very cluttered output. windump has a number of
"expressions" that can be specified on the command line when it is
run. The expressions allow the user to filter the traffic and only
report that traffic which is useful for some specific experiment. For
example, filter out all traffic except that associated with your telnet
session with the Server, knowing that telnet traffic
flows to the well-known port number 23 at the telnet server. Therefore
we can filter out all the traffic except our telnet session
by specifying: host "10.27.x.20 and port 23" when we invoke
the program on the command line. Note that command ordering should follow
the convention: command <switch> <option> <filter>.
Try this and observe the result; do not forget to include switches such as -i
and -n. You should now only see your own telnet traffic.
The windump program also has switches that allow it to report
additional interesting information about the network traffic as it dumps the
data to the output screen. To see a complete list of all the switches
available you can look in the windump manual
pages or refer to the handout provided with this lab.
Specifically you should read the sections of the manual pages that deal with
the following switches and record their meanings (we expect much more than
regurgitation of the information from the man page; you must discuss):
#3 -
Switch
|
Meaning
|
-D
|
|
-i
|
|
-e
|
|
-v
|
|
-X
|
|
(#4) When using the -s
switch, how do you ensure that you get whole packets? Experiment with the
snaplen to make sure you understand its use
Invoke windump again to filter only your telnet traffic.
Use the appropriate switches to dump the whole packets, provide a raw hex
form of the output and also the ASCII representation of this hex dump. The
hex dump provides a view of each byte that was transmitted in the IP
packet. The ASCII translation of this can sometimes be useful as the
payload portions of the telnet traffic are ASCII. For
example, if you do a directory listing over the telnet session
you can easily read the directory contents in the windump data.
On the other hand the data associated with the TCP and IP headers is
numeric encoding and is not representative of any ASCII text. windump
still tries to do an ASCII decoding for all the data and reports
it. In this case you only see some characters of gibberish and periods in
the places where non-printable ASCII codes were present. These hex
and ASCII formats for displaying the data can be useful for understanding
and debugging a network protocol. Capture your windump command
with appropriate switches in the box below, and provide a detailed
explanation of each of its components in your report (#5).
You are now to conduct the following experiments and report on them in your
lab submission.
- Use
windump to filter whole packets of only your telnet
traffic. Output the packets in both raw hex and ASCII
format. Pipe the command output to a file using the ">"
operator.
- Using a text editor (such as
WordPad or NotePad)
open this file and prepare a small sample for
printing that includes some interesting telnet payload
data; one page is sufficient. You can print this from the lab, or better
yet save the file to a USB key and integrate it in your report.
- On this packet dump clearly indicate in the hex dump section the
portions of the packet that are the: IP header, the TCP header, and
the application layer payload section.
- On a fresh copy of the packet data indicate in the hex dump section
the portion of the packet that contains the IP source address and the
TCP destination port.
- Use
windump to isolate the traffic from another
student's machine. Get them to log in to bob's account
(password hidden) over the network while you are
listening. Use windump to steal the password. Provide the
packet trace used in your analysis and indicate what part of the packet
was useful.
- Use
windump to report on the link layer addresses of
the network communication. Reproduce the network diagram in your lab
report (the source
file is here) and ensure that your network diagram includes:
- The
telnet server, the common hub, your VM and
at least one other student VMs.
- The IP addresses for all the computers and the MAC addresses for
your computer and the Server VM.
- The Ethernet links between the various interfaces as lines
connecting these components.
Part 4 - Capturing network
traffic in packet capture files and replaying it
Sure, it is interesting to conduct some analysis in the lab, but odds are
good that you will realize that you forgot something when you are writing
the report at 0200 hrs before the lab report is due; would it not be nice to
conduct analysis at home? You will now investigate the use of two more windump
switches -w and -r.
#6 -
Switch
|
Meaning
|
-w
|
|
-r
|
|
Conduct the following experiment:
- use
windump to write raw packets to file; it is
customary to name the file with the .pcap extension (for packet
capture). Write you windump command in your lab
report and explain it well:
#7:
_________________________________________________
- use
windump to read your file and filter whole packets
of only your telnet session as you have done after
question #5 above. Once again, write you windump command
in your lab report and explain it well:
#8:
_________________________________________________
When you are finished the lab, do not forget to follow the instructions
in the preamble to properly shut down your Windows VM and log out of your
host machine. Ensure that the you leave the cage in the same state you
found it, and ask the instructor for the key-press combination so you can
work here after hours.
Submit your lab report by e-mail. Place files together in a zip
file before sending. Include your report and network traffic dump
files.