Royal Military College of Canada
Department of Electrical and Computer
Engineering
EEE473 Computer Network Design
Dr G.S. Knight
Prof S. Leblanc
Lab 5
Firewalls
and Packet Crafting
References
-
- hping3
Manual
- packet-filtering-HOWTO.html
References
hping
manual
Packet Crafting
Introduction
This Exercise is an introduction to packet crafting using hping3. Packet
crafting is a technique that allows an analyst or computer attacker to
generate a network packet with the specific data content desired by the
analyst or computer attacker. The crafted packet can be used as a
diagnostic tool to probe and test network defences and firewalls. It may
also be used by an attacker for the same purposes, and to masquerade as a
legitimate communication. One family of tools used to assist in creating
crafted packets very easily is hping. These tools
can be used to:
- Test firewall rules
- Advanced port scanning
- Test net performance using different protocols, packet size, TOS (type
of service) and fragmentation
- Path MTU discovery
- and more
Hping3's implementation makes the
actual construction and transmission of a crafted packet transparent to
the user. The tool easily assembles and sends custom ICMP/UDP/TCP
packets, and displays target replies in the same way ping does with ICMP
replies. It handles fragmentation and arbitrary packet body and size,
and it can be used to transfer files under the above supported
protocols. Hping3 is
command-line oriented, and employs a large number of extensions.
Using hping3
- Open the Linux VM.
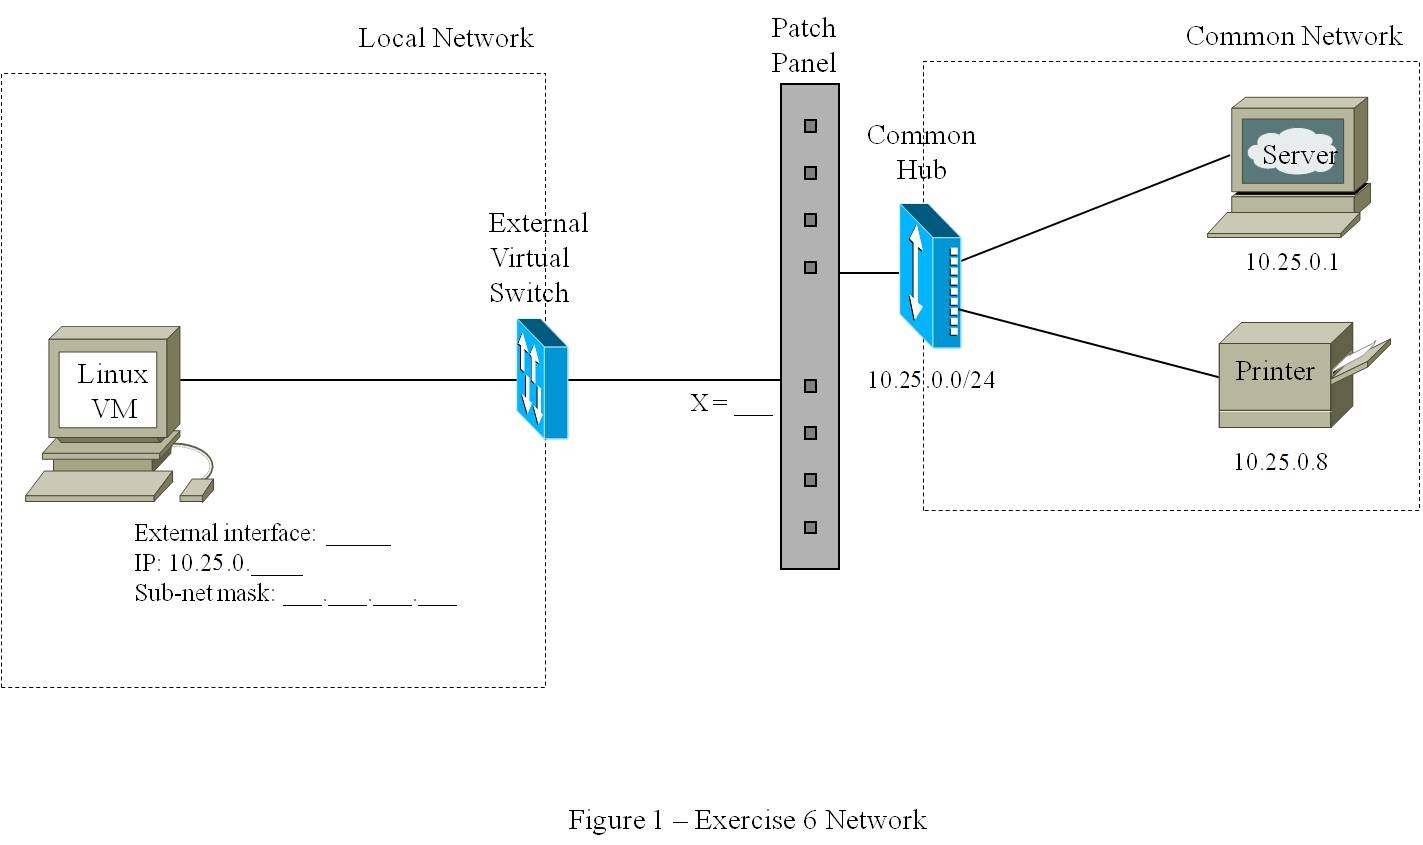
- Configure the Linux VM as per Figure 1
- sudo
ifconfig
external_interface 10.25.0.y
netmask 255.255.0.0 (where 'y' is 200+X)
- Test your setup by confirming that you can ping the Server.
- Open two Terminals:
- one will be for running hping3
- one will be for running tcpdump
Step 1
In any of these steps more information about hping3 can be found in the
manual pages: hping
manual, or by running man
hping3.
Run a simple hping3 command and observe it with tcpdump:
- sudo hping3 -c 1 10.25.0.1
Also run a standard ping and observe it
with tcpdump. Compare the packets transmitted by each program.
- If there is a destination port, what is it?
- For tcp packets, what flags are set?
Step 2
Now, use hping3 to create a standard ping packet. Use the --icmp
switch. Observe it with tcpdump.
Step 3
Now you will craft a packet that has a payload that you will specify and
send it to a port you will specify.
- Create a small text file named
hello_file that
contains the string "Hello World!"
- Note that the file has 12 characters
- Send a packet with the file's contents as a payload and observe using
tcpdump
- sudo
hping3
-c 10 --destport 12000 --data 12 --file hello_file 10.25.0.1
- use the -n
-v -X
switches with tcpdump in order to see the payload
Step 4
Now you will craft a packet where you will specify the source port, the
destination port, and that the SYN flag
be set.
- Send a packet with the specification above as a payload and observe
using tcpdump
- sudo hping3 -c
10 --syn --baseport 53 --keep --destport 12000 10.25.0.1
This kind of packet might be crafted to check for open ports. The SYN
packet should elicit a SYN-ACK
response from an open port. The --keep
switch holds the sourceport (baseport) at a constant value for all
10 packets that are transmitted. Without the --keep switch the
source port number would increment by one each time.
Step 5
Use what you understand from the last step to scan both ports you know are
open, like 23
(telnet) and 80 (http),
and ports that you expect to be closed, like 1337
and 31337.
Observe the hping packets and responses using tcpdump. What is the
difference between open ports and closed ports?
Step 6
Now you will send packets to the Linux VM
from the Server.
- You can do this by logging onto the Server
using telnet
- Run tcpdump on the Linux VM
so you can see the packets coming (you may want to use a filter on
tcpdump to eliminate the port 23
telnet traffic)
- You are to spoof a SYN packet to both an open port on the linux VM and
to a closed port on the linux VM. Hint: how do you know which services
are open on your Linux VM? What did you discover using nmap on day 4?
Alternatively you might try using netstat; check its usage with man
netstat.
- For example try:
- sudo
hping3 -c 1 --syn --destport 1334
10.25.0.x
Note that this last technique lets us probe-back at our machine from a
different location. What open ports did you find using this technique?
Firewalls
Introduction
In this lab you will become familiar with setting up a
simple network firewall. A firewall is a
security gateway that controls access between a private administrative
domain and the public Internet (RFC 2588).
A firewall can perform two primary functions:
- A protocol end point. In this case, no internal
node (other than the firewall) is directly accessible from the
external Internet, and no external node (other than the firewall) is
directly accessible from within the intranet. Such firewalls are also
known as "application-level gateways".
- A packet filter. In this case, internal and external nodes are visible
to each other at the IP level, but the firewall filters out (i.e.,
blocks passage of) certain packets, based on their header or contents.
This lab will explore the second kind of firewall
function, i.e. that of a packet filter. We will look at basic default
policy for firewall rules and how to begin to "tune" a firewall to
restrict traffic to allow only that traffic required to meet operational
requirements of the network,
and no more.
Part
1 - Explanation
of iptables packet filtering firewall
A packet filter is basically a router that acts as a
"software gate" that looks at the information in the layer 3 and 4 (ip and
tcp) headers and makes a decision on whether a packet is allowed to pass
through and continue on to its destination. For example, the packet
filter might allow packets from one range of network addresses or port
numbers through and drop packets from a different range of network
addresses or port numbers. The decisions the packet filter makes are based
on a set of rules. The rules can specify that a packet be allowed to pass,
or that the packet is to be dropped. The rules can be written to use
almost any information in the packet headers in the decision making
process (ip addresses, port numbers, fragmentation flags, protocol type,
tcp flags, etc.).
iptables
There are many different packet filter
implementations. Each different packet filter works slightly differently
and has a specific format for its rules. The particular packet filter we
will be looking at in this lab is the common Linux packet filter called iptables. There are three tables defined for iptables: filter, nat
and mangle. In this lab we will only be working with the filter
table, which is responsible for
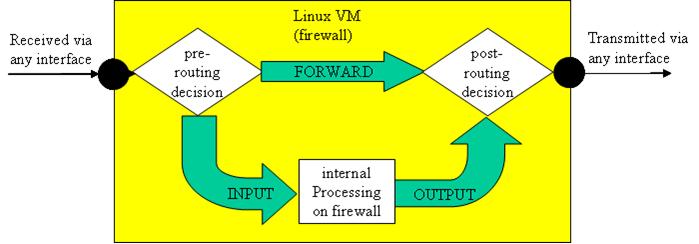
packet filtering. Each table is made up of "chains". As packets arrive at
the packet filter (firewall) they are first subjected to a "routing
process"; this routing process examines the destination of the packet and
determines which chain should be used to process the packet (see Figure
1). There are three built-in chains to which the packet can be forwarded
based on the destination specified in the ip header of the packet. Packets
destined for the firewall itself are processed by the INPUT chain (the
firewall is a computer with one-or-more ip addresses and the packet may be
destined for the firewall machine itself). Packets that are originated by
the firewall itself are processed by the OUTPUT chain. Any packets that
are from other machines and destined for other machines (i.e. that are
just passing through the firewall) are processed by the FORWARD chain.
Figure
1 - iptables Built-in Chains Configuration
Chain processing
A chain is a checklist of rules. When a packet is
being processed by a chain, each rule in the chain is applied in the order
specified by the list. If the packet matches the rule
then that packet is directed toward a "target". The most common targets
are:
- ACCEPT
- iptables stops further processing.
- the packet is allowed to proceed
- DROP
- iptables stops further processing
- the packet is blocked
iptables uses
a "first-match" approach to rule processing. This implies that processing
of the chain proceeds in order and stops as soon as there is a match with
a rule and the appropriate target is applied. Therefore
the ordering of the rules is very important. If the packet
processing proceeds all the way through the chain without a rule match
then there is one final default rule called policy
that always matches. The target for this rule can be set to be either
ACCEPT or DROP. For systems designed to have good security it is
considered good practice to set the policy to DROP. In this way, unless a
packet matches a rule (i.e. unless it is specifically allowed) then it is
dropped.
Writing rules
Rules can be added to the database of iptables rules
by using the iptables
command. A typical command to add a
rule to the firewall might have the following format:
iptables
-A
FORWARD -s 0/0 -i eth0 -d 192.168.1.58 -o
internal -p TCP \
--sport
1024:65535 --dport 80 -j ACCEPT
In this command the iptables program will append
(-A) a new rule to the FORWARD chain. The rule will match packets from any source ip
address (-s 0/0) that have a destination ip address of 192.168.1.58 (-d 192.168.1.58). In order to match, the packet must also have arrived on
the eth0 interface on the firewall (-i internal)
and be transmitted outbound to the next-hop via the eth1 interface (-o internal).
Also, the packet must be a tcp packet, destined for port 80, from a source
port on the range from port 1024 to port 65535, one of the ephemeral,
high-numbered ports (-p
TCP --sport 1024:65535 --dport 80). The
target of this rule is ACCEPT, which means that packets that match this
rule be allowed to pass through the firewall and onward to their
destination (-j
ACCEPT). Also notice that this is
a long rule and to describe it takes more than one line of text. The
backslash, '\', is used to break the line, but keep entering more text
on the next line.
In the next part of the lab, you will set up a small network and protect
it with an iptables packet filtering firewall. In that part of the lab you
will progressively build up a set of firewall rules. As you build up
the firewall rule set you will learn more about how to specify rules, and
see how the rules are defined to allow or block specific kinds of traffic.
For more information on using iptables
you can look at the packet-filtering-HOWTO.
Part
2 - Configuration of an iptables firewall
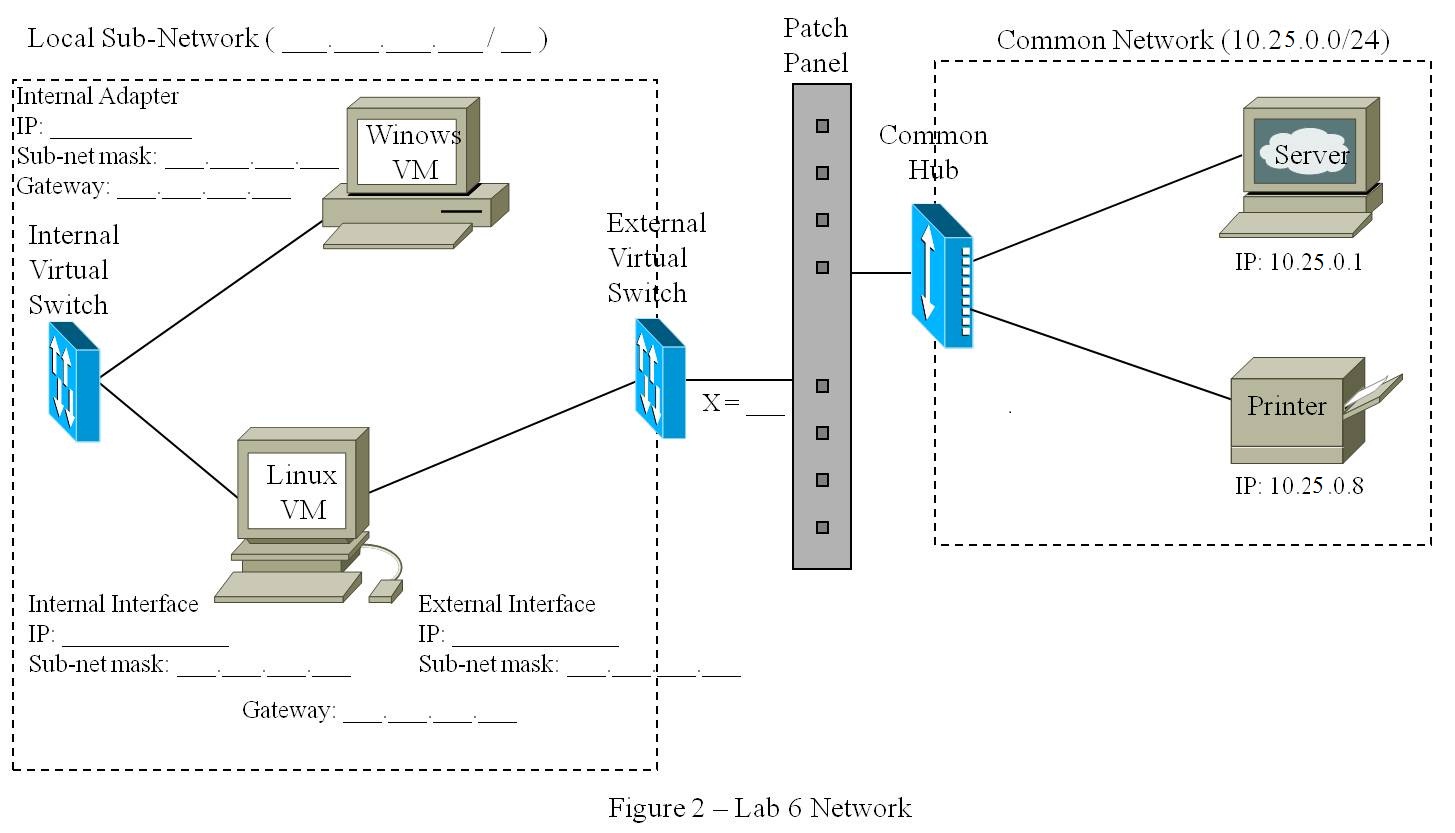
Normally to set up a firewall we use a box with two or
more network interfaces, one for the outside and one or more for the
inside networks we are protecting. In this case we will use the Linux VM, which has two interfaces:
one interface associated with the External Virtual Switch that you have
been connecting to the Common Network, and another interface that is
connected to the Internal Virtual Switch. You will use the Windows
VM to represent the internal network your firewall is protecting.
Make sure you disable the
external adapter on the Windows VM.
Set up your lab environment according to the
specifications below, and annotate Figure 1 accordingly.
- Your Local Network is defined by
10.0.x.0/24, with the following host specifications:
- The Windows VM IP address
is 10.0.x.100 (recall that x = 100 + X)
- The Linux VM IP address is
10.0.x.1
- The subnetwork gateway is the Linux
VM
- The Common Network is defined
by 10.25.0.0/24, with the following host specifications:
- Your Linux VM address is
10.25.0.y (recall that y = 200 + X)
- A Server at 10.25.0.1
- A Printer at 10.25.0.8
- The subnetwork gateway is the Server
Note that during this
segment of this lab you are acting as the System Administrator on the
Linux VM. Unlike in previous labs where you were acting in the role
of Analyst, as a System Administrator it is appropriate for you to change
to super user for root privilege.
You will need to have your Linux machine begin to act
as a router for your small network. To do this you will need to tell the
kernel to begin "ip forwarding". Follow the following steps:
- run: sysctl
-a | grep ip_forward
- this should show you a line that reads: net.ipv4.ip_forward=0
- the '0'
indicates the ip forwarding is off
- run: sysctl
net.ipv4.ip_forward=1
- again run: sysctl
-a | grep ip_forward
- you should now see a line that reads: net.ipv4.ip_forward=1
- the '1'
indicates the ip forwarding is on
- run: route
add default gw 10.25.0.1
- this
willadd
aroute
tothe
routingtable
to specify the default gateway
- run: route
-n
- confirm that your default route was added properly
For the remainder of
the lab only requires you to have regular user privilege, therefore exit
from the root account.
Remember, the laboratory instructor needs to add a
route to the main lab router that tells it that your router/firewall is
the gateway for your new LAN. Make sure you understand why this is
required.
route add -net
10.0.x.0 netmask 255.255.255.0 gw 10.25.0.y
Once you have your lab environment set up use ping or hping3
to make sure you have connectivity from the Windows
VM through to the Server.
Run telnet to connect from the Windows
VM using the account alice: alice
: secret.
Comment on any of the steps above that may have given you
difficulty. Do you understand each step?
Now that you have a network to protect you will begin to look at iptables. To begin you will look at the current configuration of
iptables and set a default policy. Note that iptables requires root
privilege to run, however we have created an alias to avoid having to
continuously use sudo iptables.
- run: iptables
-L
- -L is for 'list'
- you should see the current rule sets for each of the built-in
chains: INPUT, FORWARD, and OUTPUT
- the policy for each of these should be ACCEPT
- Open a text editor.
- you will use this editor to hold a series of commands
- you will run the commands by executing this text file as a "shell
script"
- the changes you will be making to the firewall rules are temporary
and rebooting the machine will go back to the defaults
- save this file as iptables_rules.sh
in the /home/scins/
directory
- run: chmod
755 iptables_rules.sh
- this will change the permissions
(or mode) such that the file can be executed as a shell script
- enter the following lines in your text file and save:
#!/bin/sh
iptables --flush
iptables --policy INPUT DROP
iptables --policy FORWARD DROP
iptables --policy OUTPUT DROP
- the first command flushes/removes all current rules in the chains
- the --policy commands change the default policy on the chains
- run: ./iptables_rules.sh
- this runs the shell script
- Again run: iptables
-L
- you should see that the default policy on all chains is now DROP
Now, try to ping/telnet out of or in to either the Windows VM or Linux
VM. You should no longer have connectivity. You have a firewall,
but not a useful one because you can't get any work done. You will now add
rules to permit specific kinds of network traffic to pass. The
rules should only allow packets which are part of the following scenarios
to pass. All other packets should be refused.
First you will allow ICMP
ping packets outbound from the firewall machine itself, and let the
echo-reply packets return. You will not let other machines ping your
firewall machine.
- append the following lines to your iptables_rules.sh
file and save:
iptables
-A OUTPUT -p icmp --icmp-type echo-request -j ACCEPT
iptables -A INPUT -p icmp --icmp-type echo-reply -j ACCEPT
- you can use the command: man
iptables, if you wish to examine the switches used in these
commands and get a feel for how you can specify rules
- run:
./iptables_rules.sh ;
iptables
-L
- you should see the new rules you added
Now, try to ping out from the Linux VM
to the Server, and to the Windows
VM. This should work. Note: because we did
not specify which interfaces are to be used in these match rules it does
not matter which interface is being used to ping.
Try using sudo hping3 --icmp to
do the same thing. Does this work?
Now try to use hping to do the same thing using its default behaviour of
sending a tcp packet (i.e., without the --icmp switch). What happens? The
error message may not be helpful, therefore you may have to think about
what went wrong (or right) with the firewall.
Next, we will add rules to allow the Windows
VM (or any other machine on the inner network) to ping the
outside world (i.e. sending icmp through the firewall).
- append the following lines to your iptables_rules,sh
file and save:
iptables
-AFORWARD
-s10.0.x.0/24
-picmp
--icmp-typeecho-request
-j
ACCEPT
iptables -A FORWARD -d 10.0.x.0/24 -p icmp --icmp-type echo-reply -j
ACCEPT
- run: ./iptables_rules.sh
;
iptables
-L
Now, try to ping out from the Windows VM
to the Server. This should work.
Next, we will add rules to open the firewall to allow a telnet client on
the Windows VM to connect to the
main Server.
- append the following lines to your iptables_rules.sh
file and save:
iptables
-AFORWARD
-s10.0.x.0/24
-ptcp
--dport23
-j
ACCEPT
iptables -A FORWARD -d 10.0.x.0/24 -p tcp --sport 23 -j ACCEPT
- run: ./iptables_rules.sh
;
iptables
-L
Test these rules by running telnet on the Windows
VM
to bob's account on the Server.
Make sure you understand what the rules are saying and why this allows
telnet to cross the firewall and restricts other tcp traffic. Try pinging
back from alice's account on the Server to see if your traffic in this
direction is truly blocked, as it should be.
Why are two iptable rules required and not just one?
These last rule changes to allow telnet seem straight forward. However, they
are too general and the hole they allow in the firewall to permit the telnet
traffic will also allow an attacker other access to the network. An attacker
can use the fact that traffic, any tcp traffic, from port 23 is allowed
through the firewall. One of the most basic things the attacker can do is
use the traffic to probe through the firewall. You can do this using hping. You can use
the Server to represent an
attacker's machine outside your protected network (you can use alice's
account there via telnet from the Windows
VM - alice has access to
hping). Give this a try with ports 53,
139, 445, and 12000.
- On the Server:
- sudo hping3 -c 10 --syn --baseport 23 --keep
--destport 53 10.0.x.100
What is happening? Use tcpdump to observe
(you may have to use some filters to eliminate the clutter from the telnet
traffic) and include the trace in your lab submission. Some
ports are behaving differently from others. You are scanning the internal
machine right through the firewall. Could an attacker connect to one of
the ports on the Windows VM?
In order to close this hole, and for that
matter to prohibit any traffic masquerading as legitimate telnet traffic
on port 23, we can make the following modifications to our rules.
- Change the
last lines you added to your iptables_rules.sh
file and save:
iptables
-AFORWARD
-s10.0.x.0/24
-ptcp
--dport23
-m
state --state NEW,ESTABLISHED -j ACCEPT
iptables -A FORWARD -d 10.0.x.0/24 -p tcp --sport 23 -m state --state
ESTABLISHED -j ACCEPT
- run: ./iptables_rules.sh
;
iptables
-L
The rule changes you have made make your firewall into a "stateful"
firewall. Each time a new connection is made on port 23 to an external
network a record is made of the parameters associated with the connection
(IPs, port numbers). Packets associated with this ESTABLISHED connection
will be allowed. Packets from the outside destined for the internal network,
that are not associated with an established connection, will not be
accepted.
Try your hping3 SYN-ACK probing technique again and see if the stateful
firewall rules worked. In your own words, explain why the rules above
constitute a "stateful" firewall. It may help to consider the opposite; a
non-stateful firewall.
Notice that you can not print. Why?
What would you do to solve. Hint: the printer uses TCP port 9100.
Submit your lab report by e-mail. Place files together in a zip
file before sending. Include your report and network traffic dump files.
Don't forget how important the discussion section of the lab is.