Royal Military College of Canada
Department of Electrical and Computer
Engineering
EEE473 Computer Network Design
Dr G.S. Knight
Dr S. Leblanc
Lab 6 Part 2
- Vulnerability Scanning with OpenVAS
References
Introduction
This exercise is an introduction to a vulnerability scanner called the
Open Vulnerability Assessment System, OpenVAS. Initially
you will sweep the Team and Common Network for reachable hosts. Then
you will scan several hosts to determine their open services, fingerprint
the operating systems and applications, and listting known
vulnerabilities. Finally, you will choose a few vulnerabilities for
which you will find known attacks.
Part 1 - Sweeping the network with nmap
Set-up
Set up your exercise environment according to the specifications below,
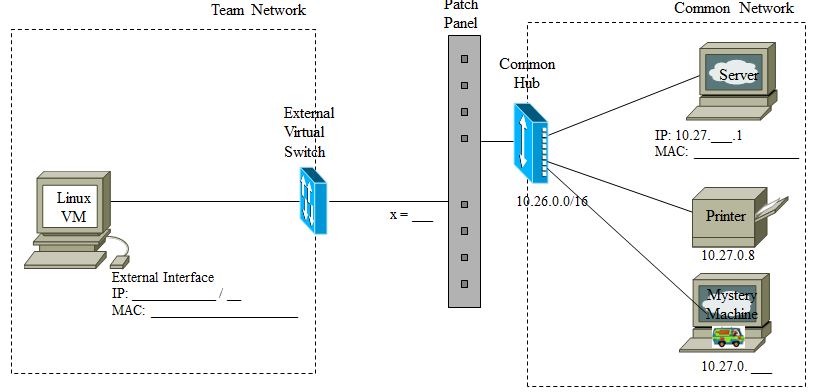
and annotate Figure 1 accordingly. The setup for this exercise is
identical to that of Lab
6 Part 1.
- The Common Network is defined by 10.27.0.0/16, with the following host
specifications:
- Your Linux VM address is 10.27.x.10
- Your Windows VM address is 10.27.x.20
- A Server at 10.27.x.1
- A Printer at 10.27.0.8
- A Mystery machine at 10.27.0.?
- Test your network configuration by pinging the Sever VM from both your
Linux VM and your Windows VM..

Figure 1 - Exercise Network
Network Reconnaissance
- Recall from Lab
6 Part 1 the use of nmap to sweep networks for
reachable hosts.
- (#19) Record the hosts that are "up". There should be at least
ten student machines as well as two or three others.
- (#20) If you do a quick Operating System detection scan (using the
-O switch), can you tell which is which?
- (#21) Identify the machines below by providing their IP address.
- Server VM
- Mystery Machine
- Your Windows VM
- One colleague's Linux VM
Part 2 - Vulnerability scanning with OpenVAS
OpenVAS is a framework of several services and tools offering a
comprehensive and powerful vulnerability scanning and vulnerability
management solution. It advertises itself as, "The world's most advanced
Open Source vulnerability scanner and manager." We will use OpenVAS to
conduct a vulnerability assessment of the machines identified as part of
the network reconnaissance conducted above.
- Run the following script to run OpenVAS.
openvas.sh- This will take a few minutes to execute. When it does, accept the
browser certificate.
- State that you understand the risks, and add exception.
- Login using the username admin and password admin.
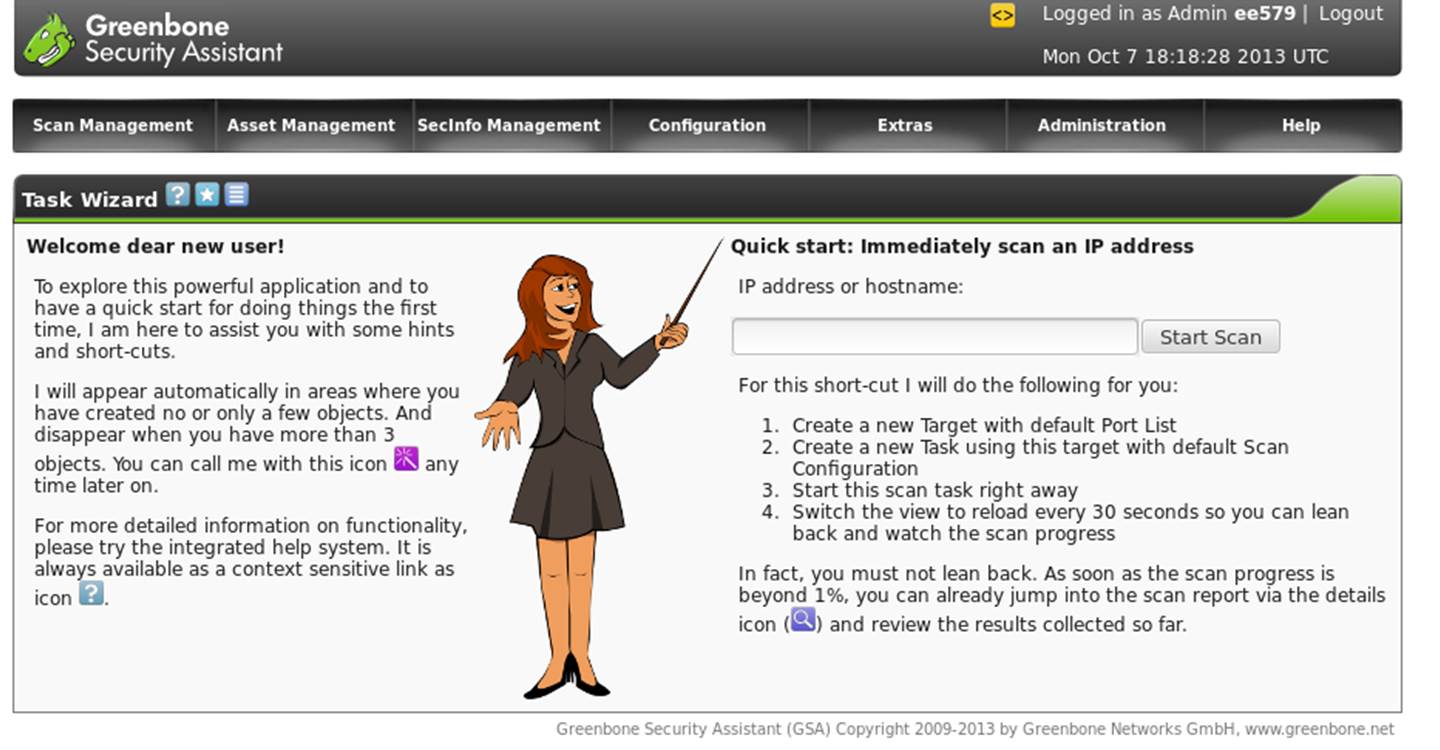
- OpenVAS will open in a browser window and appear as
depicted in Figure 2 below.

Figure 2 - OpenVAS
OpenVAS is a GUI-based application and is relatively easy to use once you
learn a few basic functions. Before you begin feel free to explore the
various functions available within OpenVAS; i.e., Scan Management, Asset
Management, etc.
- Learn how to conduct a simple scan by following the steps below to
scan your Server VM:
- Create a new target
- Configuration -> Targets
- Select a New Target

- Provide a name for the new
target
- Manually enter the host
target's IP number
- Select the OpenVAS Default
port list
- Create the target
- Create a new task using this
target with a defaults scan configuration
- Scan Management -> New
Task
- Provide a name for the new
task
- Select the "Full and fast"
scan configuration
- Select the new target
above as the scan target
- Select the default
settings for the remainder
- Create the task
- Start the scan task
- Scan Management
- Select the named task
- Start the scan

- This will likely take
several minutes, especially since you are not the only one
scanning the network.
- Review the results
- View the ongoing results

- Periodically refresh the
results until the task completes

- View the details

- Save the report.
- When the scan has completed
select all three categories of threat: High, Medium and Low
- Within the Report Summary
- Select a TXT format report
and download it

- Move this report to your
Desktop and rename it with a meaningful name.
- Now create the targets and tasks necessary to scan the remainder of
the machines identified during the reconnaissance phase.
- While you are waiting for your scans to return results, try to
determine if you are being scanned.
- For example, if you observe the network traffic by running tcpdump
you will note that there are a lot of packets traversing the
network. This is not that helpful.
- Experiment with tcpdump filters until you think you have
captured evidence of your host being scanned, or have confirmed that
you are not being scanned.
- Hint: it will help if you can figure out how to filter out your
own scanning activity.
- (#22) Record your successful tcpdump filter command.
Part 3 - Vulnerability assessment
When you have completed all OpenVAS scanning review the results for each
host.
- (#23) Summarize the results by threat category for each host and
reproduce the table below in your report.
| Identification |
Network IP |
High Treats |
Medium Threats |
Low Threats |
|
|
|
|
|
|
|
|
|
|
|
|
|
|
|
|
|
|
|
|
- Explore the high threat vulnerability findings for each host scanned.
- (#24) For any three of these high threat vulnerabilities, summarize
in your own words the service that is vulnerable, why it is
vulnerable, what exploit might the vulnerability allow and what
mitigation is required to reduce or eliminate the vulnerability.
- (#25) Which host do you feel is the most vulnerable? Why?
- Record at least three Common Vulnerability Exposure identifiers for
later investigation; ie CVE-2007-xxxx.
-
-
-
Shutting down
- Shut down the Linux VM
- Shut down the Windows VM
- Logout of the host.
You are not done yet - see next page!
Part 5 - Matching vulnerabilities with attacks
- (#26) Using a web browser (in another lab with Internet connectivity),
investigate the three CVEs recorded above, and record links to known
attacks that may work against your discovered vulnerabilities.
-
-
-
Conclusion
In this exercise you have learned the usefulness of a more powerful
open-source vulnerability scanner than one which just performs port
scanning. Understanding which specific vulnerabilities exist on your
network provides invaluable information that should be used for:
- planning and prioritizing patch management efforts;
- planning and prioritizing intrusion detection efforts;
- evolving / improving security architecture; and
- evolving / improving respective security policies, directives and
guidelines
Submit your lab report by e-mail. Place files together in a zip
file before sending. Include your report and network traffic dump
files.


